

When a word file crashes or you just close the lid of your laptop without hitting the Save button, you risk losing some of the last changes (editing, adjustments to fonts, deletions, insertions, writing several lines etc.). It's so frustrating. isn't it?
However, there is a solution to minimise this risk just by developing one simple habit and adjusting 2 settings once and for all.
Here is how it works:
1 Habit to protect you from losing the changes you made in Word
the Ctrl + S Habit
Make it a habit, or even a second nature to always press Ctrl + S every few minutes or even seconds. This is the shortcut for saving your word file or any file in Office for that matter. It is the same as choosing File--> Save. One way to develop this habit quickly is to always press Ctrl + S each time you finish writing a sentence, after the full-stop press Ctrl + S. Also after making any edits, whether is it deleting a word or inserting one, or changing the font etc. After each change press Ctrl + S
This ensures your latest edits are always saved.
However, hazards happen. Word may crash or you froget to save before closing windows. Here comes the role of these to very important settings:
1. Activate the automatic backup
This ensures your latest edits are always saved.
However, hazards happen. Word may crash or you froget to save before closing windows. Here comes the role of these to very important settings:
2 Settings to keep your changes and last edits saved
1. Activate the automatic backup
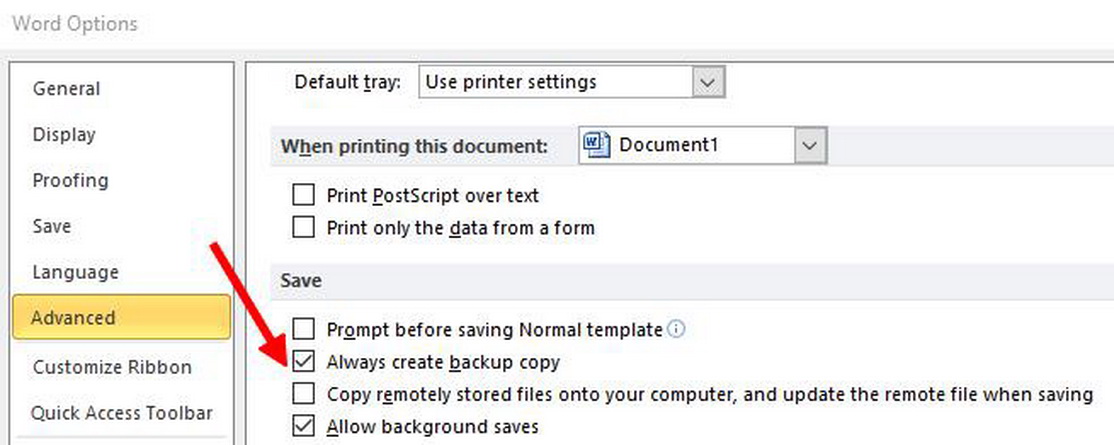 |
| Check 'Always create backup copy' to keep your before-last version https://osmanstipsntricks.blogspot.com |
As shown in the above illustration, go to: File-->Options-->Advanced. You'll see this screen. Check "Always create backup copy" as shown here. When this option is checked, each time you save your file (using Ctrl + S or File-->Save) Word does two things: a) saves the current version of the file b) saves the before-current version in a backup file in the same folder of the original one. The backup file will have the extension .wbk, and the file name is prefixed with "Backup of".
For example: if the original file name is "my cv.docx", its backup file is "Backup of my cv.wbk", in the same folder. In case of damage of the original file for any reason, you can open the .wbk file make the changes you want and save it as a .docx file.
The before-current version means: if, for example, you create a new file and write 'this is my cv', then save your file, then add a new line 'name: ', then save your file. the .wbk file will have the 'this is my cv' but not the 'name:', If you add a third line then save your file, the .wbk will have 'this is my cv', and 'name:' but not the third line. and so on.
The before-current version means: if, for example, you create a new file and write 'this is my cv', then save your file, then add a new line 'name: ', then save your file. the .wbk file will have the 'this is my cv' but not the 'name:', If you add a third line then save your file, the .wbk will have 'this is my cv', and 'name:' but not the third line. and so on.
2. Set the AutoRecovery time interval
The AautoRecovery feature is very valuable when Word crashes or you close your computer without saving your file. In either case, When this feature is activated, Word keeps an autorecovery version of your file. It does so by autosaving your file at a time interval that you set. It also saves it in a default directory, as shown in the following illustration, and not in the directory where you saved your original file.
To activate the autorecovery feature and set its time interval, follow these steps:
To activate the autorecovery feature and set its time interval, follow these steps:
 |
| Steps to activate autorecovery and set its time interval https://osmanstipsntricks.blogspot.com |
1. Make sure the checkbox of the option 'Save AutoRecover information every' is checked
2. Set the number of minutes to 1 to be on the safe side so Word Saves your file automatically every 1 minute. You'll notice in the picture I've set it to 2 minutes, but this is for a personal reason. You can follow my pattern if you are facing my same problem, which is my typing speed. I type 80 words/minute, which causes the autosave to interrupt my typing every minute for a second or two and it annoys me. So setting it to 2 minutes instead, gives me more typing flow.
3. Make sure the checkbox of the option 'Keep the last autosaved version if I close without saving' is checked. This will make sure the last autosaved version is kept if you forget to save before closing Word.
the AutoRecover file location is the folder where the autorecovery files will be kept. You can change it if you prefer.
Now if Word crashes or you close without saving, when you re-open word again, you'll see your last open files on the left pane, with a suffix to the file name, this suffix could be 'autorecovery', 'autosaved', 'last saved by user'. The names are self-explanatory, all you have to do is open each of those, then save the one having your last edits, giving it a new file name. (just add a number or explanatory word like, last-working, 2). If it annoys you to work with that new file name, close all files, re-open the one you just renamed, click File-->Save as and give it the name of your original file. Word will prompt you with a message that this file name already exists, and a choice to overrite it or not. chose overrite. and voila.. you have your original file again.
Hope this was helpful
Share this article on


No comments:
Post a Comment